Hello Everyone!!!
How have you all been? Summer is still
here and hot as ever.
Fall approaches.
I have been working on this new apartment
layout forever - for at least 3 years. Trying to
make it to where I could incorporate a kitchen and
a bathroom along with a bedroom and a bath in this
tiny space. It was
hard I must admit. Many times I kept drawing apartment
plans to see what would work and making sure that it did
work before I disposed of that layout to try another.
This used to be Elizabeth's apartment. Her apartment
was somewhat bare and housed her kids.
I did not want to change the placement of the door, nor did
I want to change the wallpapers since I liked the different
colors for many colors to co-ordinate with it.
Once I got the layout like I liked then I had to decide
what kind of furniture to put in it. Again I had to
decide what the apartment was going to look like.
Changing the apartment allowed me to house more
miniatures into the scene.
I have split the apartment up into 2 postings starting
with this one cause there are so many pictures that I
liked. The next posting will be the sewing room. The
tenant that occupies this space is a hard working lady
named AMANDA GRACE. She works by day and
she sews by night and weekends and any day that
she has off from work. Her 1st occupation is working
at a fabric store. Her second occupation is being a
seamstress!
Many people can relate to
working 2 jobs in today's economy just to make ends
meet. Undoubtedly her apartment and her work will
change over time again.
I hope that you like her living area
and her sewing area!
Be sure to zoom in to see it better.
The entire apartment can almost be seen from this
the main opening. In the background there is a
mini kitchen and mini bathroom. For now Amanda
Grace is not married. She lives alone devoid of any
children. Hopefully one day she will find her soul
mate and not have to work so hard. She might even
move into another apartment! So look for it! It
could happen!

I do not know what it is, but I love apartments and
bedrooms. Sweet kind of bedrooms but not the
kind that are nauseating, if you know what I mean.

I love to peek into windows just to look at the
scenes at different angles. I have removed the bed
in order for you to see how spacious this little
apartment is without the bed taking up the space.

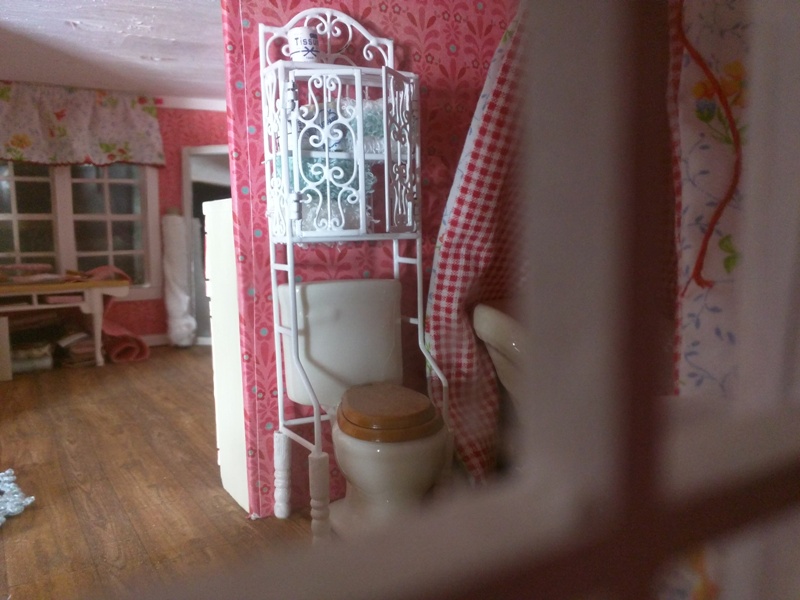
Looking in thru the window we see the bathroom
to the right. The toilet is hard to see when you look
into the room from the main side so peeking into
windows do help a lot. Many years ago I bought this
'wire thingy'. I remember these things in the 70s
and 80s. However they were just the right height,
but this miniature was too short!
As you can see, I ended up having to add legs to
it to extend it up. The legs are those little nude turnings
that come in a small package. I am sure that you
have seen them. The legs on the 'wire thingy' was
short and these turnings fit nicely to bring up the
height. The legs on the 'wire thingy' just poked into
the wood. Easy as pie to fix.
I painted these 4 white so I could
match it up to the 'wire thingy'.
Not too noticeable, I hope. The 'wire thingy' holds
towels, face cloths and toilet paper.
To the left of the bathroom you can see the foyer
and some of the sewing area.
Here is also an area that you cannot readily see.
It is the sink and the mirror above it. This is
what it looks like from outside of the window.

I am glad that I added this close up for you to see
the little sink better.

Inside the apartment, with the bed again removed
you can see the sink and the bathroom better.
The
The
fabrics took me forever to find as I was not able to
start decorating this apartment until I found what I
was looking for.
Many months I scoured the fabric
Many months I scoured the fabric
stores and thrift store bins.
Time kept passing until finally
Time kept passing until finally
I found 2 children's shirts at the thrift store that
matched perfectly!!
The red and white small check is a knit.
The red and white small check is a knit.
While the flowered fabric is cotton.
I only have a small
I only have a small
amount of the check fabric left over
and that is to make long floor length curtains for
this apartment.
But right now I like the way that
But right now I like the way that
everything looks so hopefully I will use it for
something else. T
he checked shirt had some cute
he checked shirt had some cute
trim on the bottom of it.
I utilize fabrics like this with trims.
I utilize fabrics like this with trims.
Well, back to the bathroom.
The sink is old and little.
The sink is old and little.

I forgot to take a picture of the sink before I made
the sink skirt.
The flowered shirt also had red
The flowered shirt also had red
cotton trim sewed to it like the red check did.
I could hardly believe how well
I could hardly believe how well
these 2 fabrics worked together.
Anyway under the sink I played up the
strawberry fabric and placed a white bow on the
front.
The sink skirt is NOT glued on it.
I just
The sink skirt is NOT glued on it.
I just
gathered the top really tight and knotted it.
I was surprised that it worked, but it did.
So far the skirt has not fell off
so that is a good thing.
so that is a good thing.
The mirror above the sink is a compact
mirror. We all use them I think. All I did
here was to glue red ribbon to the front
side of the mirror.
Then I turned the ribbon
Then I turned the ribbon
to the backside and glued it down.
Then
Then
just added a bow to the corner.

Finally we have reached the inside of the
bathroom.
The tub is old and clean. A blue
The tub is old and clean. A blue
towel is draped over the side. T
he canopy
he canopy
was so easy to make and stands on its
own accord.
Most knit fabrics are thick.
Most knit fabrics are thick.
They hold their shape pretty well.
The
The
cotton fabric is thin. The canopy is a
large piece of fabric.
See how tightly it
See how tightly it
is gathered at the top!
I do not have any
I do not have any
pics to show you how to make this, as
I was experimenting at the time. But
what I believe that what I did was to
measure the length of the tub which was
or is probably 5 inches long. So I doubled
the fabric about 4 or 5 inches more
making the fabric about 15 inches wide.
The height of the fabric was from floor
to ceiling as you can see. My apartments
are 8.5 inches from the floor to the
ceiling. So I added about 2 inches more
of fabric to this measurement to allow
seams.
So measure the width and the height that
you need and add in more measurements
as stated above. Then cut out your
rectangle of fabric. Cause it is a wide rectangle
once you look at it. If your cutting is not
straight enough it is okay that is why
also that there is 2 inches more of fabric.
What I did next was to turn the 2 fabrics
wrong sides together and sew it together like a
pillowcase. Sew the 2 sides together and
sew the bottom together, leaving the top
open. Now turn it to the right side. Next,
measure the height of your canopy and turn
under the top. (As you can see mine rests on
the floor.) A little ways away from the top
turn the excess fabric to the inside and hand-sew
from one side to the other side and
gather it tightly with some strong thread.
For this, I used a very long length of
quilting thread that I doubled. Be sure to
gather this tightly as it is the gathers and
the excess fabric on the top that holds
this canopy up. I then added a red matching
bow to compliment the mirror, sink and
the canopy together. This picture is a recent
picture and as you can see the canopy is
still standing just fine. There is NOT any
glue or tacky wax holding this canopy up!
There is not any stabilizer on the inside
either. I hope you will try making this
canopy as it is not hard. I am sure that
my directions has made it harder than
it is.
The little green rug also helps to
co-ordinate the space together.
It has been so
It has been so
many years now that I do not
remember where I got it from.

The bed is still omitted to give you another view
through these windows.

This is all the space that Amanda has for her
dressing area.
I will start with the coat, muff and hat.
I will start with the coat, muff and hat.
I bought this from a lady on e bay in England.
I believe that her name
I believe that her name
was Susie Isaacs?? I do not think
that she is selling anymore??
Anyway I think that she made
Anyway I think that she made
this white coat set. It
was very reasonably priced.
Things a few years
Things a few years
ago were cheaper than they are now.
This is a lovely set and is displayed on a
This is a lovely set and is displayed on a
Dawn doll manikin.
The manikins are still being sold and they hardly
cost anything.
They are generally sold anywhere
They are generally sold anywhere
on the net. They are a little flimsy
because the back side of them have nothing in them
to give them strength.
However in
However in
order to keep them standing it is best to put on the inside
bottom some clay and let it harden.
Then the manikin
Then the manikin
will not topple or fall over.
The little wire wicker stand holds some of Amanda's
things. The top shelf holds a pink box and lace
box. A hat with matching purse hangs beneath it.
There are 2 little boxes on the next shelf that are
empty, however one day it will hold her 'unmentionables'.
The green afghan was made by a dear
friend - Lynda Meyers!
I have to tell you about her
I have to tell you about her
site on eBay.
She crochets beautifully!!!
Her afghans,rugs and bedspreads
She crochets beautifully!!!
Her afghans,rugs and bedspreads
are crocheted in silk!!!
She takes custom orders and ships them
She takes custom orders and ships them
to you with tracking and gives
you the cheapest shipping that she can! Go look at her
things and you will agree with me.
Her site is:
Her site is:
http://www.ebay.com/itm/Dollhouse-Miniature-Crocheted-Bedspread-2-Pillows-Aqua-Blue-Soft-Silk-Yarn-/122115268792?hash=item1c6ea320b8:g:1sAAAOSwLnBXVJpk
Her selling name is: just_jas
The little shelf above the green afghan holds Amanda's
little wallet. This is a tiny space. Do you know
what I can use it for?
The bottom shelf holds a set of white sheets that I
made and a little box that does not open.
On the floor is some blue heels. The only pair that
she owns. This is so sad. Another box that does not
open.
The little long box holds flip flops!
More on that in a minute.
More on that in a minute.
Lynda also made the pale blue rug.
It is so lacy looking.
It is so lacy looking.
It fits nicely in this space and
matches the wallpaper perfectly.
It does not get any better than that folks!!
It does not get any better than that folks!!

You have seen this bed before. I used this bed to
show you about how I make my mattresses. I covered
the mattress in a green napkin.
The bed was white before I painted it green.
The bed was white before I painted it green.
I was going for a bed that looked
like it had been painted many times by someone
that was not a painter.
Amanda painted this bed.
Amanda painted this bed.
She is not a painter, but she loves the look of it and
that is all that matters.

Here is a top view of the canopy bed.

A closer view shows the top of the bed.
There are 2 red checked pillows
There are 2 red checked pillows
and 3 flowered fabric
pillows with red bows.
The lace is an old doily
The lace is an old doily
that is under the red checked cover with just a large
piece of it sitting on top of the
red checked cover.
red checked cover.

A closer view of the bottom.
All this is, is one large cotton doily!
All this is, is one large cotton doily!
The doily is under the mattress at the
bottom and is allowed to hang on the sides. It is
merely folded back to display the red cover and
the old lace doily.
The lovely hat was given to me in a swap years ago
by Marlene over at Somerset House!
All of my apartment
All of my apartment
colors are coming from the strawberry cotton fabric
that is on the tub canopy.

A lovely side view of the bed.
I removed the green napkin
I removed the green napkin
and covered the mattress with a thick white cotton
for the sheet.
There is not a top sheet on this bed.
There is not a top sheet on this bed.
A large piece of the red checked knit covers this bed
and is tucked under at the foot. I
bet that
bet that
it is at least an 8x8 or bigger.
It is sewed to the back of the mattress.
It is sewed to the back of the mattress.

The bed skirt was easy to make.
It is made up of 3 layers of lace.
It is made up of 3 layers of lace.
The larger bottom laces are cotton Cluny
lace, one in white and the other in cream.
These laces are sewed to a piece of
white cotton with
white cotton with
the bottom lace sewed near the bottom of the white
cotton sewing all around the
foot of the bed to the
foot of the bed to the
other side of the bed. Then the cream
lace is sewed
lace is sewed
near the top of the white cotton and allowed to hang
down. Sewed all around to the other side of the bed
just like the bottom white Cluny lace was.
This is
This is
topped off with a smaller cream piece of lace that
also goes around the entire bed sewed to the white
cotton.
This white cotton that holds these 3 layers
This white cotton that holds these 3 layers
of cotton lace merely lays under the mattress.
If you zoom in you can see a small piece
of the white cotton.

Anyway the bed turned out lovely, if I must say
so myself!!
However there is a lot of bulk under the
However there is a lot of bulk under the
mattress due to the red checked knit fabric and the
large white doily being tucked in.
Under the pillows
Under the pillows
is just a tiny piece of foam to try and offset the bulkiness
of it, trying to mask it.
I think that the loveliness of the bed does help to mask it.
I think that the loveliness of the bed does help to mask it.

Anyway you can hardly tell it is there!
Here is the
Here is the
view with the bed in place with its matching nightstand.

A better close up view of the area.

Amanda has a little table area where she can eat
or her clients can set.
I believe that many moons
I believe that many moons
ago I told you that the cake was made from erasers.
The icing is glue and white paint between the layers
and on top.
The erasers were painted to resemble
The erasers were painted to resemble
strawberry and chocolate.
A slice was cut out for
A slice was cut out for
a client to enjoy, however the bride to be does
not want to gain an ounce before her wedding!
The blue rug looks so nice
under the little table.
under the little table.
A doily given to me by
Marlene years ago is under the cake.
The chair seats are upholstered
Marlene years ago is under the cake.
The chair seats are upholstered
in the cotton flowered fabric.
Chairs were painted green to match the bed.
Chairs were painted green to match the bed.

The kitchen is barely noticeable in the space.
I will get around to that soon.
I will get around to that soon.

I wanted to show you about the little box under
Amanda's white wire wicker shelf.

It is a very small slim box. I forgot where I got it
from but I am sure that something was sent to me
in it from what I bought from eBay.
in it from what I bought from eBay.

The plastic slides away from the little box.
The little box holds Amanda Grace's
The little box holds Amanda Grace's
flip-flops perfectly!!

You can tell how little the box is with the 2 dividers.
As these little flip flops are tiny!!
They were ear
They were ear
rings that I bought from Claire's boutique at the mall.
Amanda loves the beach!
She needs a bikini now or shorts!!
She needs a bikini now or shorts!!

Just another close up of the table area.

Heading back over to the bed to check out the
nightstand.

The nightstand holds a little fan, a lamp and a
vase of flowers.
There is stuff inside of the drawer,
There is stuff inside of the drawer,
but looks like I forgot to show you its contents.
A sweet green hanger hangs from the knob.
There is an empty box under the stand and a little
shopping bag to the side.
Also I want to tell you that I bought this flooring
from the fabric store many years ago. I was surprised
to see that it was still being sold on eBay.
Just glue it down and it gives a rough feel.
Just glue it down and it gives a rough feel.
It looks so real! Better than paper!

The tiny kitchen.
The curtain is a larger piece of the
The curtain is a larger piece of the
flowered cotton.
No room for a second bead as the
No room for a second bead as the
curtain and rod are butted right up to the wall.
The little lace curtain
The little lace curtain
has a toothpick threaded thru it to hold it in the
window.
I should have painted it, but I wanted the
I should have painted it, but I wanted the
rod to show thru to remind me of what it was.
I love the chalk board above the stove!
The kitchen sink, stove and refrigerator are a little small,
but work very well in this tiny space.

The sink area holds the little bowl with spoon
where it iced the cake. I have not put any
towels in the space as I have not found yet
what will be good. Nothing is in the refrigerator
yet either. I made the little bread cabinet
many, many years ago. It is made from
cardboard. Still no bread in it.
Sometimes
the little green chair goes into the sewing
room for a guest to sit while she works.

Not many items are on the shelves.
Amanda only keeps what she needs
and since it is only her, she does
not have much.

Many years ago, I found this on
eBay. It was in a furniture
lot pile. It was not a dollhouse
miniature but it was a miniature
for something. Needing shelves
to go into the kitchen I decided to
cut it up. I did not repaint them,
just cut them away and used tacky
wax to adhere to the wall.
I still have the other pieces, no
place to put those pieces yet.
Perhaps I can find a use for them
later.
later.

This was also in the same furniture lot
pile. It is cute. Knowing that I wanted
a chalk board above the stove instead
of shelves, gave me the idea to
transform it.

I do show this a little differently in Elizabeth's
apartment.
To transform it, it was painted red.
To transform it, it was painted red.
I resized the picture that you see here to fit in
the chalk board space. I glued it over the
existing words as seen above.
There is a little
There is a little
piece of a toothpick painted white and glued
to the chalkboard under the coffee cup.
A little eraser is on top of the red board above
the words 'menu'.
Sorry, you can hardly see
Sorry, you can hardly see
it. The little eraser was cut
from a piece of
from a piece of
green scratchy pot scrubber.
I painted it a
I painted it a
dark grey and glued it on top.

I hope you have enjoyed looking at the first
segment of Amanda's apartment.
See her sewing area!
segment of Amanda's apartment.
See her sewing area!
Thank you for visiting me!!
Hopblogger