Hello Fellow Bloggers!
Hope you all are well.
Thank you for the comments.
Granny's vest is super simple. It only takes a couple
of minutes to make this.
Supplies: cotton Cluny lace, scissors to cut, tiny button,
and a small threaded needle. I always use quilting thread
cause they are strong.
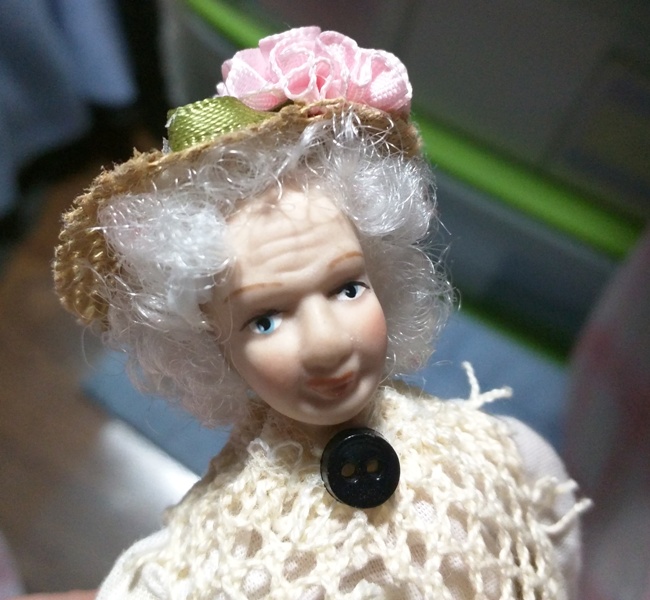
Granny wearing her vest.

The back of Granny's vest.

MAKING GRANNY'S SLIP
Granny's slip is merely a piece of white
cotton fabric sewn in the back. A piece of the Cluny
lace is sewn towards the bottom to the cotton.
Once that is done,
I cut off any excess cotton fabric at the top,
and hand gather it around her body.
Am sure you all know how - this is for those
that do not sew a lot.
MAKING GRANNY'S VEST
For those of you that do not know what cotton
Cluny lace is, this is what it looks like.

For the vest, you need approximately this much.
If you are unsure, then just cut more. Or read to
the end of the directions to get an idea.

The Cluny lace only needs to be this wide. I used this
same size width for the slip as well.

Start by positioning the lace in the front. Refer to
the complete picture of Granny, if necessary for the
placement. Ideally the center point is mid-way of
her neck. Make sure the lace is straight.

I have marked the spot with a pin of where
and how I want the hole to be for her arm
to go thru.

I cut only 2 of the threads.

At this point before
you go any further, try it on your doll to see how it fits.
If you need to cut another thread then do so then.

Ooo this fits nicely!

Now, take the cluny lace all the way around
to the other arm. See where you think that the
next hole needs to be. Be careful about stretching
the lace. You do not want the back to be tight.

Again, I only cut 2 more threads. Then place her
arm thru it.

Now, judge the front. Make sure it meets
where you want it to. Cut off any excess
that you might have once you are satisfied
with the results.

Next, take off the vest.

Thread your needle with white or cream thread. Start
at one edge and sew thru the top as you see here.

Once finished, it will look like this. Be sure to knot
both ends so your threads do not pull out.

Place the vest back onto your doll.

Just give one tie - DO NOT KNOT IT!!
You just want to make sure that the bottom ends
meet up good and that it all looks great.

Just a close-up to show only one tie - NO KNOT.

Go to the back of the doll and position the gathering
threads so they look nice.

Now you can knot it!
At this point, I will tell you DO NOT CUT THE
THREADS OFF!! If you are going to place a
THREADS OFF!! If you are going to place a
button there, then take those threads and thread
them thru the button. Then tie another knot and a
bow and then cut off the remaining threads if you
want. (I had meant to do this step, but forgot!)

Or if you prefer, then just tie in a knot, cut off the
threads, and glue on a button like so.
Enjoy!!
Thank you for visiting me!
Hopblogger